How to Turn on 2.4 Ghz Wifi Spectrum?
If you’re seeking to improve your wireless network’s reach and performance, enabling the 2.4 GHz Wifi spectrum can be a strategic move. By adjusting your router’s settings and making a few changes, you can tap into this frequency band’s benefits.
The process is simple and can greatly impact your network’s reliability and coverage. So, are you prepared to optimize your Wifi experience and harness the potential of the 2.4 GHz spectrum?
Key Takeaways
- Access router settings interface.
- Locate wireless frequency settings.
- Enable 2.4 GHz frequency for wider coverage.
- Optimize bandwidth allocation for stable connection.
- Save changes made in router settings.
Check Router Compatibility
To determine if your router is compatible with enabling the 2.4 GHz wifi spectrum, access the router’s settings interface and locate the wireless frequency settings.
Proper router placement plays an essential role in optimizing the performance of the 2.4 GHz frequency. Confirm the router is positioned in a central location within your home or office, away from walls and obstructions, to allow for even signal distribution.
Avoid placing the router near devices that could cause signal interference, such as microwaves, cordless phones, and Bluetooth devices, as these can disrupt the 2.4 GHz frequency.
Signal interference can greatly impact the effectiveness of the 2.4 GHz wifi spectrum. When selecting a location for your router, consider potential sources of interference and try to minimize their effects. Additionally, adjusting the channel settings on your router can help mitigate interference from neighboring networks operating on the same frequency.
Access Router Settings Page
You can access the router settings page by entering the router’s IP address into a web browser. Typically, the default IP address is 192.168.1.1 or 192.168.0.1, but you can find this information in the router’s manual or on the manufacturer’s website.
Once you have entered the IP address into your web browser, a login page will appear. Enter the username and password for your router. If you haven’t changed these from the defaults, you can find them in the manual or on the manufacturer’s website.
Within the router settings page, you can troubleshoot any issues you may be experiencing with your Wi-Fi network. If you encounter problems, check the troubleshooting tips provided by the manufacturer.
It’s also a good idea to check if your router’s firmware is up to date. Firmware updates can sometimes improve the performance and stability of your router. Look for the firmware update instructions within the settings page to confirm your router is running the latest software version.
Locate Wireless Settings Option
Navigate to the wireless settings option within the router settings page to configure your Wi-Fi network settings. In the wireless settings, you can fine-tune various aspects of your network for best performance.
When troubleshooting Wi-Fi connectivity, adjusting signal strength can help improve the reach of your network. This adjustment is particularly useful in larger homes or offices where the signal may weaken at a distance.
Ensuring network security is vital in preventing unauthorized access to your Wi-Fi network. Within the wireless settings, you can set up encryption methods such as WPA2 to protect your data.
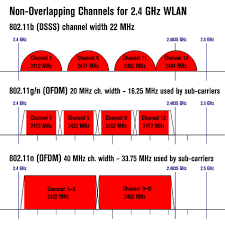
Additionally, selecting the appropriate channel can help minimize interference from other nearby networks. Choosing a less congested channel can enhance the overall stability and speed of your Wi-Fi connection.
Enable 2.4 GHz Frequency
Consider adjusting the router settings to activate the 2.4 GHz frequency for broader Wi-Fi coverage. To optimize frequency usage, you should navigate to the router’s settings interface. Look for the wireless settings section and locate the frequency band options. Select the 2.4 GHz frequency to guarantee better signal penetration through walls and over longer distances.
Activating the 2.4 GHz frequency can help mitigate signal interference issues that commonly occur in crowded Wi-Fi environments. By allocating specific bandwidth to this frequency, you can improve the speed performance of your network, especially for devices located farther from the router. This frequency band is suitable for activities such as web browsing, email, and light streaming.
To enhance your overall Wi-Fi experience, make sure that the bandwidth allocation for the 2.4 GHz frequency is optimized to match your usage needs. By enabling this frequency and fine-tuning the settings, you can achieve a more stable and reliable connection throughout your home or office.
Save Settings and Reboot Router
To guarantee the changes take effect, save the settings and restart your router. This step is essential after enabling the 2.4 GHz frequency on your router.
Follow these best practices to secure a smooth process:
- Save Settings: Once you have made the necessary adjustments to enable the 2.4 GHz spectrum, locate the ‘Save’ or ‘Apply’ button on your router’s configuration page. Click on it to save the changes you have made. This step secures that the settings are retained even after a restart.
- Restart Router: After saving the settings, it’s recommended to restart your router. This action helps in applying the changes effectively and secures that the 2.4 GHz frequency is activated correctly.
- Troubleshooting Tips: In case you encounter any issues post-restart, try resetting your router to its default settings and reconfiguring the 2.4 GHz frequency. Additionally, confirm that your devices are within the range of the 2.4 GHz network for best connectivity.
Connect Devices to 2.4 GHz Network
First, verify that your devices are compatible with the 2.4 GHz network by checking their specifications.
Next, select a unique network name (SSID) for your 2.4 GHz network to distinguish it from other networks in your vicinity. This will help you easily identify and connect your devices to the correct network.
Device Compatibility Check
When connecting your devices to the 2.4 GHz network, verify compatibility by checking the specifications of each device for 2.4 GHz Wi-Fi support. Ensuring that your devices are compatible is essential for a seamless connection experience.
Here are some key steps to follow:
- Signal Interference Analysis: Evaluate the surroundings of your devices to identify potential sources of interference that may affect the 2.4 GHz signal quality.
- Device Firmware Update: Check if there are any firmware updates available for your devices. Keeping the firmware up to date can improve compatibility with the 2.4 GHz network.
- Compatibility Troubleshooting: If you encounter connection issues, troubleshoot compatibility by checking settings, ensuring the device supports 2.4 GHz, and verifying network configurations for best performance.
Network Name Selection
Selecting a unique network title for your 2.4 GHz network is crucial to differentiate it from other networks and facilitate smooth device connections. When picking a network title, refrain from using common names like ‘Home’ or ‘Wifi’ to enhance security measures and prevent unauthorized access. Opt for a title that is particular to your household or office, making it simpler for you to identify and link your devices.
To guarantee peak performance, be mindful of signal disruption when choosing your network title. Avoid using special characters or spaces in the title as these can sometimes cause connectivity issues. Additionally, keep the title brief and easy to recall for efficient device pairing.
When determining a network title, take into account the following factors:
| Network Title Guidelines | |||
|---|---|---|---|
| Avoid common names | Select a title specific to your location | Mindful of signal disruption | Keep it brief and memorable |
Test Connectivity and Range
You should start by conducting a Connectivity Range Test to confirm all devices can establish a stable connection within the desired range.
Next, evaluate the Signal Strength to determine the quality of the connection and identify any potential interference issues.
Connectivity Range Test
To assess the connectivity range, perform a comprehensive test to evaluate the reach and stability of the 2.4 GHz Wifi spectrum.
Conduct a speed test to measure the data transfer rate and guarantee that the connection speed is sufficient for your needs.
Check the signal strength in various areas of your location to pinpoint any weak spots where the signal might drop or become unstable.
Perform an interference check to identify any sources of signal disruption, such as electronic devices or physical obstacles, that could impact the network’s performance.
Signal Strength Evaluation
Assess the signal strength of the 2.4 GHz Wifi spectrum by conducting a thorough evaluation to guarantee peak connection quality and range efficiency. Begin by performing a detailed signal strength analysis to determine the quality of the connection.
This analysis involves measuring the received signal strength indicator (RSSI) and signal-to-noise ratio (SNR) to evaluate the overall signal quality. Additionally, conduct interference evaluation to identify any sources of signal disruption or noise that may impact connectivity.
Evaluate spectrum usage to optimize the use of the 2.4 GHz frequency band efficiently. By analyzing the spectrum occupancy and identifying potential congested channels, you can enhance performance and minimize interference. Adjust channel configurations and transmission power levels based on the evaluation results to improve signal strength and overall network stability.
Continuously monitor signal strength and make adjustments as needed to maintain peak performance. By regularly evaluating the signal quality and spectrum usage, you can ensure reliable connectivity and maximize the range of your 2.4 GHz Wifi network.
Coverage Area Assessment
Assess the coverage area of your 2.4 GHz Wifi network by conducting connectivity and range tests to achieve the best signal reach and performance.
To evaluate the coverage area effectively, consider the following:
- Signal Strength:
Measure the signal strength at various points within the coverage area to identify weak spots that might require signal boosters or repeaters for peak performance.
- Interference Analysis:
Conduct an interference analysis to detect any sources of signal disruption or noise that could be affecting the network’s reach and stability.
- Network Speed and Bandwidth Utilization:
Test the network speed and monitor bandwidth utilization across different areas to maintain consistent and reliable connectivity for all devices within the coverage range.
Conclusion
To wrap up, by following these simple steps to activate the 2.4 GHz WiFi spectrum on your router, you can improve signal penetration, reduce interference, and enhance network coverage. Remember to save your settings and reboot the router for the changes to take effect.
Connecting your devices to the 2.4 GHz network will provide a more stable and reliable wireless connection, ensuring a better overall experience for your network users.